CheeseCutter
CheeseCutter-EXTended User Guide
This is the consolidated user guide for CheeseCutter-EXTended 0.5.1.
CheeseCutter-EXTended is based on CheeseCutter 2.9.
The old web-guide screenshots from origin/dev_docs are kept in guide/pics/.
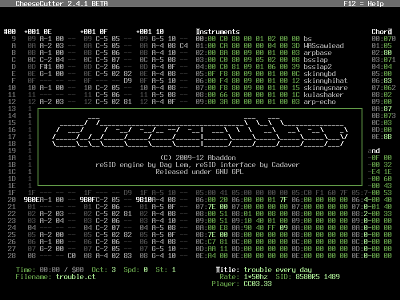
Where Help Lives
The live help text shown by F12 is in src/ui/help.d.
Context help for player tables is generated from player metadata and rendered by
src/ui/tables.d.
Default keyboard bindings are registered in src/com/shortcuts.d and connected
to UI actions in src/ui/ui.d.
Command-line help is printed by src/main.d for ccutter and src/ct2util.d
for ct2util.
Manual pages remain in doc/*.1. Extra implementation notes are in doc/*.md
when present.
Quick Start
Open the editor:
ccutter [OPTION]... [FILE]
Useful startup options:
| Option | Meaning |
|---|---|
-f |
Start fullscreen |
-nofp |
Use old reSID instead of reSID-fp |
-i |
Disable interpolation |
-m 0 / -m 1 |
Select 6581 / 8580 SID model |
-n |
NTSC mode |
-r <hz> |
Audio sample rate, default 48000 |
-b <size> |
Audio buffer size |
-fpr <n> |
SID filter preset |
-y |
Use YUV video overlay |
--height <rows> |
Sequencer height, 32-64 |
--width <cols> |
UI width in columns, up to 200 |
--autoscale |
Auto-scale UI to the screen |
Export or transform songs with ct2util:
ct2util sid mytune.ct -o mytune.sid
ct2util prg mytune.ct -o mytune.prg
ct2util dump mytune.ct -o mytune.asm
ct2util import base.ct other.ct -o merged.ct
ct2util init player.bin -o new.ct
Menus
The top row is a menu bar. Press Esc to open it; every command in the editor (everything except live note entry) is reachable from a dropdown, with its keyboard shortcut shown on the right of each item.
| Key | Action |
|---|---|
| Esc | Open the menu bar (or close it again) |
| ← / → | Switch between top-level menus |
| ↑ / ↓ | Move between items (separators and disabled items are skipped) |
| Enter | Run the highlighted command |
| Space | Flip the highlighted on/off command, keeping the menu open |
| Mouse | Click a title to open it; the highlight follows the pointer as you hover items, the pressed item turns yellow, and the command runs when you release the button. Press elsewhere to close. You can also press a title and drag straight onto an item in one motion. |
The menu bar is shown from startup. The fixed menus are File, Edit, View, Playback, Navigate (jump between the sequencer, tables and song info) and Help. Before Help, context menus appear that follow whatever you are editing: the F6 note column shows Note (note-level commands) and Sequence (sequence-level commands plus the shared sequencer commands); the F5 track column shows Track + Sequence; the instrument list shows Instrument; the wave/pulse/filter/command/chord tables show Tables. The bar remembers the last menu and item you used, so re-opening with Esc returns you to the same place. Hovering an item for a second shows its full description as a tooltip.
On/off commands (voices, interpolation, keyjam, help texts, fullscreen, tracking)
show their current state with a [x] / [ ] checkbox in an aligned column; each
item’s keyboard shortcut is shown on the right. Space flips such an
item without closing the menu (handy for switching several voices at once);
Enter flips it and closes the menu as usual.
The menus are generated from the same shortcut registry that drives the
F12 help and doc/KEYBOARD.md, so a command, its label and its shortcut
are defined in exactly one place and can never disagree between them.
Command Palette
Press Ctrl-P (or Esc then just start typing) to
open the command palette — a > prompt, VS Code style, that searches as you
type. It is also reachable as Help → Command palette.
The palette matches your query case-insensitively against the name and
description of every command reachable from where you are (the global commands
plus the active context’s), against each command’s keyboard shortcut, and
against the .ct/.ct2 song files in the current directory. Searching by
shortcut means typing e.g. ctrl, F2, ctrl-p or p lists the commands
bound to matching keys. Better matches sort first (name/shortcut prefix, then
word starts, then any substring), commands above songs; commands show their
keyboard shortcut on the right and songs a load tag.
| Key | Action |
|---|---|
| any printable character | Add to the query and refilter |
| ↑ / ↓ | Move the selection |
| Enter | Run the selected command, or load the selected song |
| Backspace | Delete the last character (dismisses when the query is empty) |
| Esc | Dismiss |
| Mouse | Click a suggestion to run it, click elsewhere to dismiss |
One quirk: Space cannot be the first typed character (in the menu
bar it flips the highlighted on/off item), but it works fine inside a query
(e.g. play from).
Global Shortcuts
| Shortcut | Action |
|---|---|
| Esc | Open the menu bar (see Menus) |
| Esc, then type | Command palette: search commands and songs (see Command Palette) |
| Alt-Return | Toggle fullscreen |
| F9 | Load song |
| Shift-F9 | Import ProTracker module (.mod) |
| F10 | Save song |
| Shift-F10 | Export song (Full player .prg / Optimized .prg / PSID; options dialog) |
| Ctrl-Shift-F10 | Render audio (.wav / .flac; duration, normalize, bit depth, rate) |
| Ctrl-F10 | Quick save (no filename prompt) |
| F11 | About dialog |
| F12 | Context help |
| F12 again in context help | Global help |
| Ctrl-F12 | Screenshot |
| Shift-F12 | Toggle the oscilloscope overlay (see Oscilloscope) |
| Alt-H | Toggle table byte help |
| Ctrl-Shift-F | Toggle the filter track column (see Filter Track) |
| Alt-F4 | Quit (asks for confirmation) |
Quit is Alt-F4, or open the menu bar with Esc and choose File → Quit. The confirmation warns when the song has unsaved changes (“You have unsaved changes. Really exit?”).
Load / Save Dialogs
In the load (F9), save (F10) and .prg export dialogs:
- Type-ahead: with the file list focused, just type the beginning of a
directory or file name — the cursor jumps to the first matching entry
(case-insensitive). The prefix you typed is shown in the dialog title
(
find: …); Backspace trims it, and it resets after a one-second pause so you can start a new search. (In the save dialog the filename field has focus by default; Tab to the file list for type-ahead.) - Song preview: when the focused file is a CheeseCutter song, its Title / Author / Release are shown above the Directory row, so you can identify a tune without loading it.
- Favorite directories: bookmark a directory with Ctrl-D (or right-click it) — favorites are listed at the top of every file dialog (starred, in yellow) and selecting one jumps straight to it. Repeat to remove. Up to 10 are kept and they persist across sessions.
- Separate directories: the load/save (
.ct) browsers share one remembered directory; the.modimport, the song export, and the instrument load/save browsers each remember their own.
Importing ProTracker modules (.mod)
File → Import .mod… (Shift-F9) brings in a ProTracker
.mod as a starting point for a SID arrangement. Pick a .mod in the file
browser — which previews each file’s Title and channel count the way the
Load dialog previews .ct songs. After you choose the file, an options dialog
(all defaults on) lets you set which channel to exclude, whether to build
Placeholder instruments, and which effect groups to translate — Arpeggios,
Pitch slides, Tone portamento, Vibrato and Speed & groove;
Up/Down moves,
Space/←/→ changes a row, Return
imports, Esc cancels. The import replaces the current song’s sequences
and orderlist. It is meant as a rough transcription — what carries over, and what
does not:
- Three channels. The three SID voices take the first three channels other
than the excluded one (the Exclude channel setting, default 4 → channels
1–3). Set it to
noneto import channels 1–3 regardless, or to any channel to drop that one. - Patterns become sequences, cut at pattern breaks. A pattern is cut at the
first row with a pattern-break (
Dxx) or position-jump (Bxx) effect on any channel — that row is where ProTracker leaves the pattern, so the rows below it are dead code and are dropped. The kept rows become one sequence per voice (a break-less 64-row pattern is split into two, since a sequence page holds at most 63 rows plus its end mark). Sequences are numbered in running order and deduplicated, so a pattern that appears several times in the order list reuses the same sequences; the orderlist replays the module’s order and loops back to the start. - Notes are transcribed by name (a MOD
C-2becomes aC-2), snapping any off-table period to the nearest note. - Sample names → instrument descriptions, and the MOD sample numbers are
kept as the instrument numbers, so you can see at a glance which instrument
each part expects (e.g. sample 1 “bass” → instrument
01). - Some effects are translated (approximately). Each maps onto CheeseCutter’s
own per-row command / chord machinery:
- Arpeggio (
0xy) → a chord-table entry (base, +x, +y) triggered on the note; identical arps are shared. - Pitch slides (
1xx/2xx) and tone portamento (3xx) → the slide and portamento commands (portamento arrives as a tied target note). Slide rates are approximate — the SID works in frequency units, ProTracker in Amiga periods. - Vibrato (
4xy) → the hi-fi vibrato command. - Speed (
Fxx) → the song speed; an alternating-speed “funk” groove is installed as the break-speed table (the tune then runs at song speed0).
Effects fire on the note they accompany. What can’t map to the SID is dropped: sampled audio, per-channel volume / volume slides / tremolo (the SID has only one global volume), panning, sample offset and the Amiga LED filter.
- Arpeggio (
- Samples are not imported, but placeholder instruments can be. Sampled audio
cannot become a SID voice. With Placeholder instruments on (the default),
each sample gets a plain
$11(triangle + gate) instrument whose envelope hints at the sample: a non-looping sample decays (AD = 0N,Nfrom the log of its length) and a looping one sustains (SR = N0,Nfrom its volume). The imported tune is then immediately audible and exports to.prg/.sid; you refine the wave/pulse/filter programs from there. Turn the option off to keep the current instruments instead.
Importing does not touch the file on disk and leaves the song unnamed (with a
.ct name suggested), so a later save never overwrites the source .mod. A
module with more unique patterns than fit CheeseCutter’s 128 sequence slots
(roughly 21) is rejected with a message rather than importing partially.
Playback
| Shortcut | Action |
|---|---|
| F1 | Play from playback mark |
| Shift-F1 | Play/resume from mark with tracking |
| F2 | Play from start |
| Shift-F2 | Play/resume from start with tracking |
| F3 | Play from cursor |
| Shift-F3 | Play from cursor with tracking (if already playing, just enables tracking) |
| F4 | Stop |
| F8 | Fast forward 5 frames |
| Shift-F8 | Fast forward 25 frames |
| Scroll Lock or Ctrl-F5 | Toggle tracking while playing |
| Ctrl-1/2/3 | Toggle voices |
| Ctrl-F9 | Cycle playback visualization |
| Ctrl-F2 | Toggle interpolation |
| Ctrl-F3 | Toggle SID model |
| Ctrl-F8 | Next filter preset |
| Ctrl-Shift-F8 | Previous filter preset |
Loop over a selection. If a block is selected in the sequencer when you start playback (F1, F2 or F3), playback plays and loops that block’s rows only — it starts at the block’s top row and jumps back there each time it passes the bottom. Clear the selection (Ctrl-D) to go back to normal playback.
Exporting and rendering a song
There are two dialogs: Export song (Shift-F10) for the
C64 formats — Full player .prg, Optimized .prg, PSID — and Render audio
(Ctrl-Shift-F10) for offline-rendered .wav /
.flac. Both share the same layout: pick the Format at the top (cursor on it;
</> or ←/→ cycle), set the options
below (those that don’t apply are greyed and skipped), and Return
continues to the file-save dialog (the same one used for saving a song —
type-ahead, song preview, overwrite confirmation); Esc cancels.
Navigate rows with ↑/↓; on the selected row, < reduces and > increases the value (toggles flip), and you can type hex/decimal digits directly. The FLAC-options row is a text field — just type into it (Backspace deletes).
Export formats:
- Full player .prg — the current subtune shipped as the whole editor memory image verbatim (the same image used for hardware playback): standalone and self-running, but large and unoptimized. Honours the display toggles below.
- Optimized .prg — the song purged (unused sequences/instruments/table entries
removed), relocated and re-assembled, exactly like
ct2util prg. Far smaller. - PSID (.sid) — a PSID file, exactly like
ct2util sid.
Export options (each enabled only where it applies):
- Relocate output to address — where the player + data is relocated (default
$1000; optimized / PSID only). - Relocate zero page — relocate the player’s zero-page usage (
$00= leave default; optimized / PSID only). - Export single subtune — export only one subtune (
allexports every subtune; optimized / PSID only — the full player always uses the current subtune). - Set the default subtune — the PSID start tune (PSID only).
- Executable (player + UI) — optimized
.prgonly: when yes the file embeds the self-running player and the on-screen UI (autostart + display), looking and playing like the full-player.prgbut far smaller; when no it is just the player routine + compacted song data (the blobct2util prgproduces), to be driven by your own player. (The full player is always executable; PSID never is.) - Show title/author/release · Raster-time meter · Playback timer — opt out of
the title/author/release rows, the green raster-time border meter, and the
Time: MM:SSclock in the on-screen display (executable.prgonly).
Render audio (Ctrl-Shift-F10) renders the
chosen subtune offline through the same reSID engine as live playback, so it
matches what you hear (SID model, filter, multiplier). Audio (.flac) is only
offered when the flac command-line tool is on your PATH (brew install flac);
otherwise WAV only. Options:
- Render subtune — which subtune to render (
currentby default). - Duration (sec) — render length (a SID tune loops forever, so a fixed length is needed).
- Fade-out (sec) — linear fade to silence over the last N seconds (0–30) so a fixed-length cut doesn’t end abruptly.
- Normalize — when yes, peak-normalize the render to −1 dBFS (off by default). Applied before the fade.
- WAV bit depth —
8/16/24(PCM) or32-bit float. (reSID’s output is 16-bit; the wider depths are valid files but don’t add real precision. FLAC can’t carry float, so it offers 8/16/24.) - Sample rate (Hz) —
22050/44100/48000; this actually re-renders reSID at that rate (it isn’t a relabel). - FLAC options — the
flacencoder flags, an editable text field pre-filled with--best(FLAC only; the-s -f -o/input args are added automatically).
Hardware playback (C64 Ultimate)
Start with ccutter --ultimate <IP> to play on a real C64 through a
1541 Ultimate / Ultimate64 over its REST API instead of the built-in reSID
emulation. The player and song are injected once, then edits and play/stop are
mirrored to the machine live; local audio is muted while the editor keeps
following along. Use --ultimate-port <n> for a non-default port, and set the
CHEESECUTTER_ULTIMATE_PASSWORD environment variable if the device has a network
password (firmware 3.12+).
While a hardware/emulator backend is active the bottom-bar SID field shows the
backend name plus the SID model the target actually has — auto-detected on the
machine at inject time (e.g. Ultimate 8580, Vice 6581) — instead of the local
reSID model, since the audible SID is the real machine’s and local reSID is muted.
A muted channel is truly silenced on the real SID (not just left ringing).
The on-target screen (shown on the real C64 / in x64sc) mirrors CheeseCutter’s
colours and shows, below the time/raster line: the detected SID model, per-voice
on/off (a muted voice dims), the player position in hex, and the .ct filename.
The position (Pos) is the song row playback is on: it starts from the row you
started playback at (so play from cursor shows that row, not 0) and loops back
to the song’s loop point when the song loops, staying in step with the audio.
You don’t have to set the backend on the command line: open File → Properties
to choose the playback backend (reSID, C64 Ultimate, or VICE) and switch it
while the editor is running — no restart needed. The same dialog edits the
reSID SID model and filter preset, the Ultimate IP and port, the path to x64sc
(for the VICE backend), and the SDL audio driver (changed live). Options that
don’t apply to the selected backend are greyed out and skipped by the cursor.
Properties & preferences
File → Properties opens a settings dialog (Up/Down to move, Left/Right to change a value, type into the IP/path fields, Return to apply, Esc to cancel); options that don’t apply to the selected backend are greyed and skipped:
| Field | Meaning |
|---|---|
| Playback backend | reSID / Ultimate / VICE — applied immediately |
| SID model | reSID chip model: 6581 or 8580 (reSID backend only) |
| Filter preset | reSID filter curve for the chosen SID model (reSID backend only) |
| Ultimate IP / port | The C64 Ultimate REST endpoint (Ultimate backend only) |
| x64sc path | Path to the x64sc binary for the VICE backend (blank = found on PATH) |
| Audio driver | SDL audio driver for local playback (blank = SDL default); switched live |
Settings are saved to a JSON preferences file and reloaded at startup (created with defaults on first run). Command-line flags override the saved values for that session. The file lives in the per-OS config directory:
- Windows:
%APPDATA%\CheeseCutter-Extended\config.json - macOS:
~/Library/Application Support/CheeseCutter-Extended/config.json - Linux:
$XDG_CONFIG_HOME/cheesecutter-extended/config.json(or~/.config/cheesecutter-extended/config.json)
Colors (palette)
Colors are configurable through a JSON palette. The editor renders from a 32-entry color table (16 base C64 colors, plus a fixed brightness gradient used for the ADSR/playback fade); the palette file lets you redefine the base colors and re-map the UI’s semantic roles onto them. With no palette file the built-in defaults reproduce the classic C64 colors exactly.
The file is loaded at startup, in this order:
--palette <file>on the command line, if given; otherwisepalette.jsonin the config directory (same folder asconfig.json, see above); otherwise- the built-in defaults.
A malformed file, a missing --palette file, or an unreadable one is reported
on standard error and the editor falls back to the defaults — it always starts
with a usable palette.
The schema has two tiers (both optional; anything omitted keeps its default):
{
  "colors": { "green": "#55ac4d", "blue": "#2d2b9a" },
  "roles":  { "frame": "green", "playbackBar": "blue" }
}
colorsredefines any of the 16 base colors by name to a#rrggbbhex value. Names:black,white,red,cyan,purple,green,blue,yellow,orange,brown,lightred,darkgray,gray,lightgreen,lightblue,lightgray.-
rolespoints a semantic UI role at one of those base color names, so you choose colors by purpose rather than by hue:Role Used for backgroundthe editor backdrop / default cell background textdefault light text cursoredit cursor / current-row highlight framewindow and box frame lines playbackBarthe row the player is currently on wrapBarthe pattern wrap indicator bar selectionBarblock-selection highlight bar activeInstrumentthe playing voice’s instrument number filterStaticfilter value taken verbatim from the table filterCalcfilter cutoff being swept/calculated filterEmptyin-song filter row with no active value filterHeaderthe filter table header
A complete, ready-to-edit default palette (every color and role spelled out)
ships as doc/palette.json — copy it to the config
directory as palette.json and tweak.
Window Navigation
| Shortcut | Action |
|---|---|
| Tab / Shift-Tab | Next/previous bottom subwindow |
| Ctrl-Tab | Cycle main windows |
| Ctrl-Shift-Tab | Cycle main windows backwards |
| Alt-1/2/3 | Voice 1/2/3 |
| Alt-V | Sequencer |
| Alt-4 or Alt-I | Instrument table |
| Alt-5 or Alt-W | Wave table |
| Alt-6 or Alt-P | Pulse table |
| Alt-7 or Alt-F | Filter table |
| Alt-8 or Alt-M | Command table |
| Alt-9 or Alt-D | Chord table |
| Alt-T | Song info |
Sequencer
Use F5, F6, and F7 to switch sequencer views. These also work from any other window — they focus the Sequencer first — and are listed in the Navigate menu and the command palette:
| Shortcut | Action |
|---|---|
| F5 | Track column |
| Shift-F5 | Hybrid track/sequence view |
| F6 | Note column |
| F7 | Track overview |
| Backspace | Set playback mark |
| Ctrl-Backspace | Set wrap mark |
| Ctrl-Home or Ctrl-H | Jump to playback mark |
| Ctrl-Z | Undo |
| Ctrl-R | Redo |
| Insert / Delete | Insert/delete |
| Shift-Insert / Shift-Delete | Insert/delete row |
| Enter | Pick the current row’s instrument as active (any column; empty row does nothing) |
| Alt-Q/A | Transpose semitone up/down |
| Alt-W/S | Transpose octave up/down |
| Alt-./, | Increase/decrease row highlight |
| Alt-0 | Reset highlighting to current row |
| Alt-E | Toggle row counters |
| Alt-T | Toggle relative notes |
| Ctrl-Space or Ctrl-K | Toggle keyjam (use Ctrl-K on macOS, which claims Ctrl-Space) |
Block Selection (copy / cut / paste / merge)
Select a rectangular block — a range of rows across one or more voice columns — and move it around. It works in both the F6 note column (the block is note data) and the F5 track column (the block is track-list entries), and is designed to extend to the player tables later.
Make a selection by left-dragging with the mouse, by left-clicking one corner and then Shift-left-clicking the opposite corner, or with the keyboard markers below. A plain left-click clears the selection and just positions the cursor. Paste and merge write into the currently active voice(s) from the cursor down and are clipped to the current sequence/track end — anything that would overflow is dropped. If an area is highlighted when you paste, the clipboard is instead written into that area and clipped to it (never beyond). Merge only fills rows that are currently empty. Paste new instead inserts brand-new track(s)/sequence(s) at the cursor, sized to hold the block.
While a note-column selection is active, the transpose keys (Alt-Q/A semitone, Alt-W/S octave) apply to every selected note instead of the default (which transposes from the cursor to the end of the sequence).
| Shortcut | Action |
|---|---|
| Left-drag | Select a block (single or multiple voice columns) |
| Left-click + Shift-left-click | Select the block between the two clicked corners |
| Ctrl-B | Mark selection start at the cursor |
| Ctrl-Shift-B | Mark selection end at the cursor |
| Ctrl-D | Clear the selection |
| Ctrl-C | Copy the selected block |
| Ctrl-X | Cut (blank the rows, keep the length) |
| Ctrl-V | Paste over rows from the cursor (overflow dropped) |
| Ctrl-Shift-V | Merge into empty rows only |
| Ctrl-Shift-N | Paste as new track(s)/sequence(s) |
In the F5 track column, Ctrl-C/Ctrl-V fall back to the older count-prompt track copy/paste when no block is selected.
Track Column
These shortcuts apply in the F5 track column.
| Shortcut | Action |
|---|---|
| Up/Down | Previous/next track in the active voice |
| Page Up/Page Down | Previous/next track in the active voice |
| Hex digits | Edit the transpose/sequence track value |
| Ctrl-F | Find next unused sequence number |
| </> | Decrease/increase sequence number |
| Alt-Q/A | Transpose active voice tracks from cursor to end up/down |
| Insert or Return | Insert a track at the cursor |
| Delete or Backspace | Delete the track at the cursor |
| Ctrl-Return | Insert a track at the end of the active voice and jump there |
| Ctrl-Insert/Delete | Insert/delete a track at the end of the active voice |
| Ctrl-Shift-Insert/Delete | Insert/delete a track at the cursor for all voices |
| Ctrl-C or Alt-Z | Copy tracks to the clipboard after asking for a count |
| Ctrl-V | Paste copied tracks after asking for insert/overwrite |
| Ctrl-I | Paste copied tracks as insert |
| Ctrl-O | Paste copied tracks as overwrite |
| Alt-B | Paste copied tracks as insert |
| Ctrl-Alt-1/2/3 | Swap active voice tracks with voice 1/2/3 |
Note entry uses a piano-style keyboard:
 2 3   5 6 7   9 0
Q W E R T Y U I O P
 S D   G H J
Z X C V B N M
1 enters gate off, A or ! enters gate on, , toggles tie, and ; toggles automatic instrument entry.
Player Tables
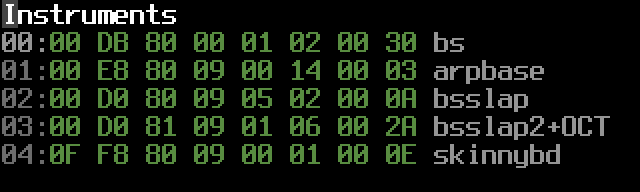
Instrument bytes:
| Byte | Meaning |
|---|---|
| A/B | ADSR |
| C | Restart type and wave delay |
| D | Hardrestart waveform |
| E | Filter table pointer, 00 means no new filter |
| F | Pulse table pointer, 00 means no new pulse |
| G | Unused |
| H | Wave table pointer |
Click an instrument’s number (the NN: column on the left) to make it the
active instrument. Double-click a table-pointer byte — H (wave), F
(pulse) or E (filter) — to jump straight to that row/program in the
corresponding wave / pulse / filter table.
Instrument color tags
You can color-code an instrument by putting a $ tag anywhere in its
description (the text field to the right of the instrument bytes). The digit(s)
after $ are hex 0–F, the 16 standard C64 palette colors:
| Tag | Effect |
|---|---|
$X |
Draw the instrument number in palette color X (foreground only; background unchanged) |
$XY |
Foreground color X and background color Y for the instrument number |
The tag recolors the instrument’s number both here in the instruments list and
everywhere it appears in the track view, so a sound is easy to spot at a glance.
The first valid $ tag wins, and a $ not followed by a hex digit is ignored
(so it stays usable as ordinary text). The tag text itself remains visible in
the description.
The color only replaces the default gray — the editing cursor, the
playback/selection highlight and the active-instrument color always override it,
so navigation stays readable. Example: a description of Lead $E shows the
Lead number in light blue; Bass $1F gives a white number on a light-grey
background.
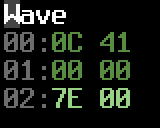
Wave table byte A is transpose/control and byte B is waveform/delay:
| Value | Meaning |
|---|---|
00-5F |
Relative transpose |
80-DF |
Absolute note |
7E |
Stop |
7F |
Wrap, byte B is target |
byte B 00 |
Keep previous waveform |
byte B 01-0F |
Override wave delay |
byte B 10-DF |
SID waveform |
byte B E0-EF |
SID waveform 00-0F |
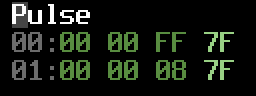
Pulse table bytes are duration, add value, init value, and jump. Duration
00-7F sweeps up; 80-FF sweeps down. Jump 7F stops by returning to the
idle row.
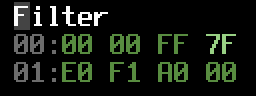
Filter table rows follow the pulse-table style. If byte A is at least 80,
the row initializes filter type, resonance/voice mask, and cutoff. Filter add
values wrap, so FF subtracts one.
Filter Track
The pattern view shows a read-only filter track column between voice 3 and the instrument table. The SID has a single, global filter shared by all three voices, so this column reflects the resulting filter registers per song row rather than per-voice note data — it is never editable.
For each row it shows, left to right: the 11-bit cutoff (3 hex digits),
resonance (0–F), the active filter mode (L/B/H for low-,
band- and high-pass, - when off), and a 3-character channel mask
(X/- for voices 1–3 routed through the filter).
The values are produced by tracing the song through the real player, so they account for the filter table, instrument filter pointers and filter commands — exactly what the chip will do. The cutoff is color-coded: a value taken straight from the filter table (a step that sets the cutoff, or a held value) is shown in one color, while a cutoff that is being calculated by a running sweep is shown in another. Resonance, mode and mask are always table-exact.
The trace covers the song’s first pass; the SID filter is global, so its state can differ on later loop iterations. During playback the highlighted (playing) row therefore shows the live filter registers — always matching what you hear — while the other rows show the traced estimate.
Press Ctrl-Shift-F (or View → Filter track) to hide or show the column.
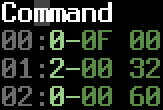
Command table byte A selects the command, bytes B/C are parameters:
| Command | Meaning |
|---|---|
0 |
Slide up |
1 |
Slide down |
2 |
Vibrato |
3 |
Detune |
4 |
Set ADSR |
5 |
Lo-fi vibrato |
6 |
Set waveform |
7 |
Portamento |
8 |
Stop slide/portamento |
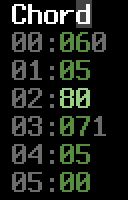
Chord values 00-3F transpose up, 40-7F transpose down, and 80-FF wrap.
The first chord set is used as the swing tempo program when song speed is 0 or
1.
Oscilloscope
Press Shift-F12 (or View → Oscilloscope) to toggle a framed overlay. It has two modes, drawn pixel-sharp (a real polyline / envelope and a drawn zero line, not text-cell graphics):
- Song playback — a live combined trace: the mono mix of all three SID voices, exactly the signal reSID sends to the sound card, scrolling in real time.
- Keyjam — a recorded-note waveform (like an audio editor): each struck note is recorded and drawn as a min/max amplitude envelope over its whole duration, so you can see attack/decay/sustain/release, modulation and how one instrument compares to another. A thin gate on/off bar along the top shows where the note’s gate is held versus released. Playing another note records afresh.
Unlike the Load/Save/Export dialogs, the oscilloscope is non-modal: it floats over the editor without stealing the keyboard, so playback controls and keyjam keep working with it open. Press Shift-F12 again to hide it.
The keyjam waveform auto-fits the whole note by default; zoom its timebase with Alt-↑ (in — shorter window, more detail) and Alt-↓ (out — back toward the whole note). The zoom is remembered for the session; the status line reports the current factor. Zoom applies only to the keyjam waveform — the live playback trace has a fixed timespan.
Notes and quirks:
- The keyjam recording captures the note from the key press until it decays to silence (or a few seconds’ cap). A held key sustains without retriggering; releasing the key gates the note off, so its release tail is recorded and the waveform ends there.
- Under the
--vice/--ultimateremote backends the sound is produced on the (emulated or real) C64, but the local reSID engine is kept running silently, so the scope still shows an approximation of the output. - It is a single combined trace — there are no per-voice scopes.
Practical Tips
Keep sequence 00 empty unless you specifically need it; it is commonly used
as a dummy sequence.
Set the playback mark only where voices are aligned. If the view drifts while editing, Ctrl-L centers the active sequencer view.
Use subtunes for working sections, then combine them into the final tune.
Packer treats a subtune as unused if all voices contain a single A000
track value.